Free shipping today only at the Land of Nod!


When it came time to buy new bedding for my tween daughter, the first place I thought to check out was the Land of Nod and I am so happy I did. They have fun, quality options. We couldn't be happier with the end result of her room.

If you have ever wanted to buy something fun from the Land of Nod, today is the perfect time. Once a year, they offer free shipping on everything but furniture. Today is that day. Take advantage of this great special and get shopping!

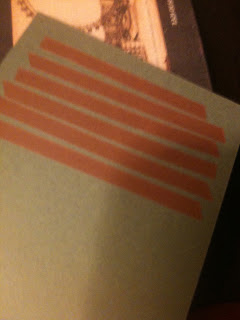
Valentine Banners + A Ribbon Rosette Tutorial
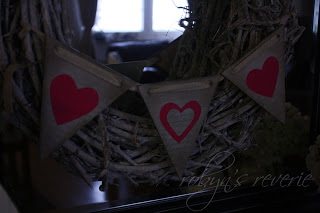

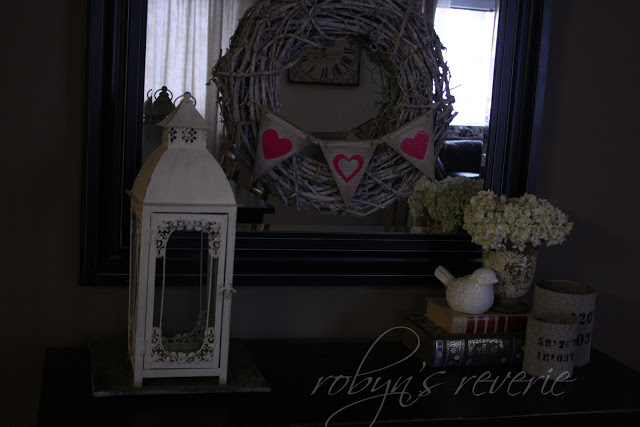


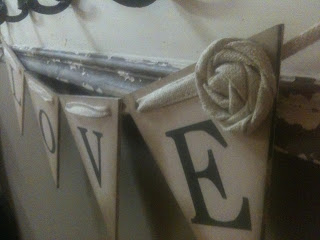
These lovely banners were sold for a limited time in my etsy shoppe this year for Valentine's Day. On each banner, I featured a delicate ribbon rosette. I thought I'd share a very amateur tutorial on how to make these sweet little rosettes.
You will need ribbon, double sided adhesive and a piece of cardstock.
1. Start by lining the piece of cardstock with double sided adhesive. Make the sticky space large enough to accommodate the desired size of your rosette.
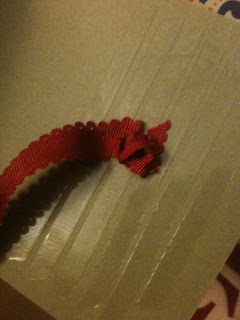
2. Tie a knot at the end of your ribbon. This will be the center of your rosette.

3. Start twisting and wrapping. As you twist the ribbon, wrap it continuously around the knotted center.
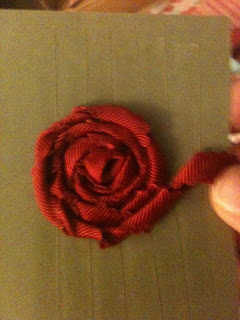
4. Keep twisting and wrapping until your rosette is the size you desire.

5. Trim the ribbon and tuck the end under the completed rosette.
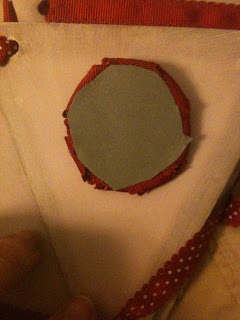
6. Trim away all the excess cardstock until you can no longer see it from the front. You will place your adhesive on the cardstock backing of the rosette. It is now ready for your project!
Happy to be sharing at Feathered Nest Friday on French Country Cottage!
Happy February | Free Desktop
I can't believe it's February already. I am looking forward to loving on my family with some special treats this month. And here is a treat for you! February's free desktop. Enjoy.

For the love of French soaps.

I found this amazing dish at IKEA about a year ago. I knew I needed it for our master bath, but was stumped with what to do with it.

Enter Provençal soaps.
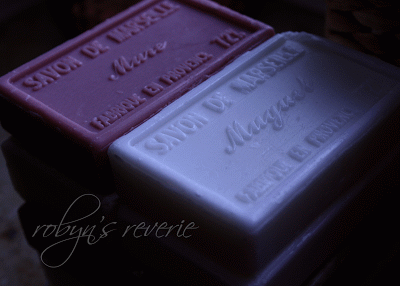
How unbelievably blessed I am to have spent a week in Provence last spring with my family. We visited the local markets on a daily basis.

The first market we went to was in L'isle-sur-la-Sorgue. It was there we found the most lovely soaps from Marseilles. They were so inexpensive. I wish I would have bought more. I keep hoping they will be featured at a local bazaar.
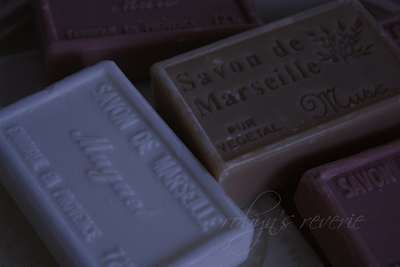
If you do not happen to find yourself in Provence, you should be able to find lovely unwrapped soaps at any natural foods store or local market in your area. For extra special, extra lovely soaps with a cause, check out The Poppy Soap Company. Lindy makes all her soaps with certified organic materials and for every bar you purchase, she will donate a bar to your local women's shelter. How amazing is that?

Our Homes Past and Present | Grand Forks

Ah, North Dakota. It's certainly a place I never thought I'd end up living, but I loved it there. We made some great connections and enjoyed the quiet pace of life.

Because of my husband's job, we had to live on base. I would have to say we certainly lucked out with our home.

When we moved here, I switched up my decorative accessories to a pretty blue. You can see that in the curtains as well as the pillows, throw and other accessories.


The living room and formal dining room were connected, so the blue spilled into each room.


In the kitchen, I was still favoring the cranberry accessories along with some mustard colored accents.


In the family room I embraced full on red, though this didn't last too terribly long. I eventually tossed the slipcovers to reveal our denim colored sofa and love seat. The red accessories, however, stayed the duration.


This is our school + play area just next to the family room. I loved this little space. Our kids did, too. My favorite thing of this area was the red curtain rods and the smocked curtains. (Still have them. Still love them.)

We had a nice little half bath off the front hallway.


Kate's sweet little room is still a favorite of mine. I loved all the lavender items my mother in law made by hand for us.


Claire's room is still super sweet as well. This one was nice and cozy.

The girls' shared bathroom. It was very spacious and lovely in steel blue with sage accents.

The master bath was awesomely large. We loved all the counter space.
And somehow, I have not been able to find any pictures of our guest bedroom or the master. If and when I do, I will be back to post them. I am loving seeing how the overall feel of our home has changed with just a few different colored accessories. Hope you enjoyed the tour!!
Valentine's Day Decor | String Hearts

I originally found this idea via Pinterest. It led me to Camilla's lovely blog, Family Chic. There you can find the directions to these simple, yet quite lovely hearts.

I swapped out the bright colors Camilla chose for something a little closer to my decor style. I picked up white and flax colored yarn at a local store. I didn't have the floral wire Camilla used, so I used a medium gauge craft wire to shape the hearts. After some trial and error, I realized I needed to wrap the wire heart with a layer of yarn before weaving the web around them. This kept the yarn webs taught with no slipping.

I love this project. It was simple enough to do with my children and they add a special touch to our living area.
French Cheeseboard Centerpiece

Over the summer, I found the beauty that is Kristine's style over at The Painted Hive. Since then, I have ogled her home over and over and dreamed of ways I could incorporate her style into my own home. One thing I really loved was the way she styled her dining room table. The centerpiece was a simple collection of things: a pair of lanterns, a floral arrangement, and some fruit centered around a cheeseboard. It was an aha! moment for me. I needed a cheeseboard.
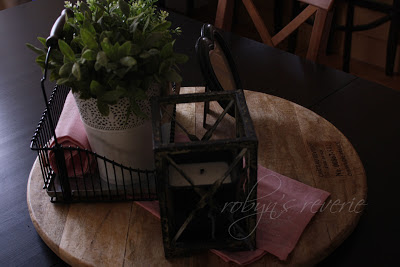
How lucky I am that I happen to live in Europe at the time of this revelation. I started the search. Of course, it needed to be French. This was non-negotiable. I've been to several bazaars since summer and I've seen lovely vintage cheeseboards. For whatever reason, they didn't seem right to me.
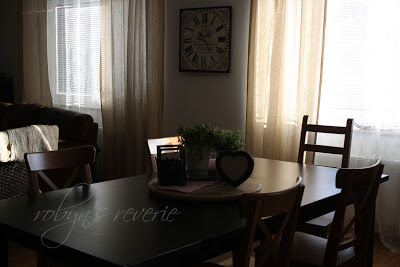
Last weekend, I finally stumble upon the perfect option. Don't you love when things mesh so perfectly? You see, there are these amazing wine racks that Americans love to buy over here. They are actual champagne riddling racks directly from Reims, France. They are beautiful. But we have a wine rack we love and it's hard for us to find a place for a riddling rack in our home. Nonetheless, I couldn't imagine leaving Europe without an authentic riddling rack.
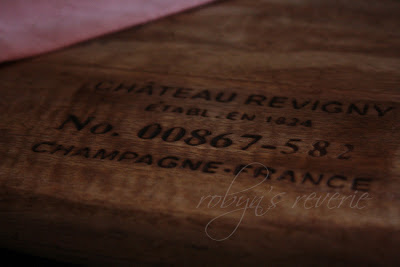
So, we found ourselves at the place in Germany that sells these lovely items with the stamp of authenticity. I stood in the shop debating with myself over this wine rack and I happened to see this beautiful cheeseboard! It is made of the wood from the riddling racks in Reims and even has the stamp of the vineyard. How perfect! I was so excited about my find and couldn't wait to get home and style it up myself.
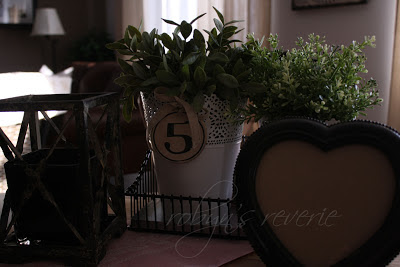
The items currently in use are what I had on hand. I am sure they will be changed plenty of times throughout the year to accommodate different holidays and the changing seasons. Right now, I have some lovely pink tea towels from IKEA and a rustic heart frame as a nod to Valentine's Day. Of course, I will be adding a family picture and some other fun things, but I am quite happy with the way it all turned out.
20 Bags in 20 Days | An Organizational Challenge for YOU!

In my last post, I shared my thoughts on breaking down the clutter in your home. I also shared a great resource to declutter in 2013. Maybe you are looking for a smaller commitment? Maybe you don't have a ton of decluttering to do, but could still use a bit of a refresher. That is where I stand. So, I've come up with this: 20 bags in 20 days. It's not an original idea. I believe the first suggestion was 40 bags in 40 days and I've seen all sorts of numbers in between. I looked at my calendar. I assessed the needs in my home. I realized this could all be done in time for the beginning of Lent. Just imagine: a clear, clean home in time for all the wonderful reflection of the season. I'm excited about it.
So, here's what you do.
1. Grab a trash bag.
2. Go to your designated spot.
3. Set a timer for 15 minutes. Just 15 minutes.
4. Clean out and clear out!
5. Take that bag to the trash, the thrift shop, your neighbor's house... wherever. Just get it out.
6. Sit back, relax, enjoy less stuff.
PS - This is a list I personalized for the needs in my own home. I'm sharing with you all in order to give you an idea of what may need to be done in your home.
PPS - Yes, I do need FOUR days to concentrate on our school closet.
Clutter | Does it ever end?
A very common topic that comes up when I am speaking with others about home decor and organization is clutter control. No matter how hard we try, it seems to never fully go away. I admit that I am constantly working on getting rid of clutter in my own home and it is still always there. I've just gotten good at hiding it.
Last year, I embarked on a decluttering adventure beginning in January. I documented my experiences, including before and after pictures all the way through April. I quit documenting the decluttering process only because taking the pictures, editing them and typing up a post each week was very time consuming. The actual decluttering was not. It was a very simple process and one I'd recommend again in a heartbeat. If you struggle in this area, go visit Beth at My Simpler Life right now. She has an awesome decluttering calendar that breaks it down week by week. I've said this before and I stand behind it 100% today, it is extremely difficult to have a comfortable, pretty and functional home when it is consumed with clutter. I say it in love, but it is true.
My number one tip on keeping clutter under control is to recycle, donate, throw away, get rid of stuff you do not use or need! I admit because we move every 1 to 3 years, I am forced to do this much more often than the average person. I grew up as a packrat, but I have absolutely zero qualms about getting rid of things anymore.
If you don't need it, don't even bring it in the house. Don't accept free samples, gifts, leftover craft supplies, etc. I am extremely tempted by these things. But you know what happens when I do bring home those free samples, leftover craft supplies, or things other people are getting rid of? They sit in my bathroom drawer unused or in a box on the top shelf of our school closet or worse.... they create clutter in my home. I don't need that and you don't either. Just say no to free stuff!! (Unless you will really, truly use it.)
Bring one in, take one out. Better yet, bring one in, take TWO out. This goes for clothing, toys, shoes, dishes, appliances, etc. We let Christmas win this year, but I still very much intend to get this done by the end of January. For every toy my kids received, we will be donating at LEAST one. (hopefully more) We weed through the kids' clothing regularly and send outgrown items to family members or to the thrift shop. I used to save it just in case, but I no longer do that. I do keep a few very sentimental pieces of clothing that belonged to my children, but certainly not everything. * One exception to this would be if you have the space and you know without a doubt there will be a sibling coming up that could use this clothes, go ahead and store it away. I am all for saving money!
So there are my top three tips for cutting back clutter. It isn't easy and it's not always fun, but the result is so, so worth it. Having a clutter free home creates serenity and a place of refuge from our otherwise chaotic life. Take the time to invest in the peace of your family!
That space above the kitchen cabinets & how to tackle it.
A few days ago I posed a question on my facebook page: "What are your trouble spots?" I had a few readers mention that empty space above their kitchen cabinets. How can you make it look warm and how do you do that without spending a lot of money?
Happily, creating a warm, inviting space does not require spending vast amounts of money. All it takes is a little creativity and a lot of scouring. I would suggest hitting up thrift shops, second hand stores and even some fun antique places. Go to the garage sales in your neighborhood and don't forget to swing by the clearance section of Hobby Lobby and Target! Just browse. Look for something that jumps out at you... something that makes you feel warm and happy. Take it home, clean it up and set it out.
I've collected some photographs from various sources of ideas for you. These are things I would do in my own home. If it is necessarily your style, perhaps it can give you a jumping point.
1. Antique Books
This idea is awesome because old books can be found anywhere for a great price. You can stand them on their sides of stack them. Either way adds a charming touch. {both images via pinterest.}


Let's say you find some books with great shape that are the perfect size, but you hate the colors. Don't worry! Simply cover them in kraft paper (or even a brown paper grocery sack!) and stack 'em up. {For example: Mara Zepeda's gorgeous books}

2. Black & White Photos
I absolutely LOVE this idea from Casa Cullen. I think the key to this working is using the same color of frame all the way across. While the photos don't necessarily have to be black and white, I would stick to photos that are the same tone. Don't go with pictures that are too detailed as that will make it look cluttered and busy. Landscape or architectural photos would be ideal.


Hopefully, these ideas will help you as you tackle your own cabinets. Please share any ideas you may have as well! Happy decorating.
Happily, creating a warm, inviting space does not require spending vast amounts of money. All it takes is a little creativity and a lot of scouring. I would suggest hitting up thrift shops, second hand stores and even some fun antique places. Go to the garage sales in your neighborhood and don't forget to swing by the clearance section of Hobby Lobby and Target! Just browse. Look for something that jumps out at you... something that makes you feel warm and happy. Take it home, clean it up and set it out.
I've collected some photographs from various sources of ideas for you. These are things I would do in my own home. If it is necessarily your style, perhaps it can give you a jumping point.
1. Antique Books
This idea is awesome because old books can be found anywhere for a great price. You can stand them on their sides of stack them. Either way adds a charming touch. {both images via pinterest.}
Let's say you find some books with great shape that are the perfect size, but you hate the colors. Don't worry! Simply cover them in kraft paper (or even a brown paper grocery sack!) and stack 'em up. {For example: Mara Zepeda's gorgeous books}
2. Black & White Photos
I absolutely LOVE this idea from Casa Cullen. I think the key to this working is using the same color of frame all the way across. While the photos don't necessarily have to be black and white, I would stick to photos that are the same tone. Don't go with pictures that are too detailed as that will make it look cluttered and busy. Landscape or architectural photos would be ideal.
3. Vintage Canisters
I love the way Lu styled these canisters and the baby's breath in just one of them is a perfect touch. If you MUST included greenery or faux flowers on top of those cabinets, this is the way to go. Just a little bit. Gone are the days of stuffing tons of faux greenery up there!
If you are in the market for some canisters and you adore French country, I am in love with this set from Attic Antics. The numbers on them add the perfect industrial touch.
4. Enamelware
I have a small love affair with enamelware. It is no doubt that a collection of these beauties (large or small) would be a lovely addition to the tops of your kitchen cabinets. {photo courtesy of Country Living}
5. Wicker Jugs
These may be a littler harder to find, but I think it would be highly worth it. They are elegant and simple, yet unique. They are a perfect touch to farm kitchen. {photo courtesy of Atlanta Homes Magazine}
Hopefully, these ideas will help you as you tackle your own cabinets. Please share any ideas you may have as well! Happy decorating.