Rainy Day Project | Reading Nook
Just a few days ago, I saw this pin in my feed. I immediately repinned it and went to the original source. Unfortunately, it did not come from a blog post, but rather the flickr feed of Kim Rakes. Happily, the idea was simple: Use a tension rod between the wall and a piece of furniture to create a small nook for your child. Seeing as how I have about 13 tension rods in our storage space, I decided the project was simple and easy enough to do right away. I ran downstairs, grabbed one, and got straight to work.

Here is my daughter's room from the doorway. You can hardly see the awesome little space we created. It blends so nicely with the rest of her room.

For the curtains, I just used some old curtains that were folded up in my linen closet "just in case." This was the perfect reason to dig them out.

I added a pillow chair, a favorite quilt, and throw pillow on top of this super soft, super comfy faux sheepskin rug. Don't you want to climb in?

The roof is actually a remnant from some of my favorite window sheers. I bought them at IKEA, so they had to be cut to size. My daughter had been saving them in her closet for fort building.


For the curtains, I just used some old curtains that were folded up in my linen closet "just in case." This was the perfect reason to dig them out.
I added a pillow chair, a favorite quilt, and throw pillow on top of this super soft, super comfy faux sheepskin rug. Don't you want to climb in?
The roof is actually a remnant from some of my favorite window sheers. I bought them at IKEA, so they had to be cut to size. My daughter had been saving them in her closet for fort building.
We both agreed the remnant was perfect for the roof because it is beautiful and functional. A good amount of sunlight still makes it's way into her nook thanks to the sheer roof.
And here is my happy customer working on schoolwork in her new favorite spot. This was definitely one of my favorite projects. It was easy and totally free. You simply cannot beat that.
Free Desktop | January

I have a thing for pretty desktop backgrounds. I hope you do, too.
After not being able to find just the right one that suited my style, I decided to make one of my own. Because I am so thankful for my readers, I am going to be offering you a free desktop background each month. Lucky you.
To set up your own desktop, hover your mouse above that pretty picture up there and right click. Click on "Save picture as..." and put it somewhere you will remember. After you've done that, go to the picture in that spot you remembered and open it. When the photo is fully opened, right click and select "Set as desktop background." Easy peasy.
Enjoy.
Our Homes, Past and Present | Troy, Illinois
In the next couple of weeks I hope to share with you all several photos of our homes in the years past. We have been very fortunate to live in some beautiful places with wonderful people. Our adventure isn't over yet! We will be heading back to the States within the year!
Our very first home was an apartment in northwest San Antonio. Did digital cameras exist back then? They may have, but we did not own one. Our second home was in Edmond, Oklahoma and we loved it. It was our first house. We had amazing next door neighbors, a wonderful church and amazing friends. Digital cameras had been invented during this time, but we still did not own one. I hope to dig up some pictures soon.
The third place we lived together was in Troy, Illinois: right outside of St. Louis. It was one of my favorite houses. Our neighbors there were incredibly warm and friendly.

Looking through my pictures, I can't believe how much my decorating style has changed. We sure loved red!


We finished the basement to add a family room and a guest bedroom. Love the color palette in the guest room.(Minus the red, of course.) Whew! That is a bright green in the family room.


I think in hindsight, Kate's nursery is my favorite. Obviously, that is due to the very soft color palette and the large amounts of vanilla coloring. It was so relaxing to me then as a mom of a newborn and a nearly 3 year old. It still invokes feelings of relaxation in me today.


 Oh, that bed. Our basement flooded in Rhode Island and I was more worried about my bed than my wedding dress. True story. Love it so. I haven't gotten to use it in nearly FOUR years. It wouldn't fit up our turning staircases in Rhode Island, so it lived in the basement. When we found out we were moving to Germany, we decided to leave it in storage. It was a good thing as it would never have fit in our bedroom in Simmozheim!

Loved our back porch and yard. We ate outside very, very often!

Our house backed up to a farm. We had a lovely view of rows and rows of corn. We loved it there.

Our very first home was an apartment in northwest San Antonio. Did digital cameras exist back then? They may have, but we did not own one. Our second home was in Edmond, Oklahoma and we loved it. It was our first house. We had amazing next door neighbors, a wonderful church and amazing friends. Digital cameras had been invented during this time, but we still did not own one. I hope to dig up some pictures soon.
The third place we lived together was in Troy, Illinois: right outside of St. Louis. It was one of my favorite houses. Our neighbors there were incredibly warm and friendly.
Looking through my pictures, I can't believe how much my decorating style has changed. We sure loved red!
We finished the basement to add a family room and a guest bedroom. Love the color palette in the guest room.(Minus the red, of course.) Whew! That is a bright green in the family room.
I think in hindsight, Kate's nursery is my favorite. Obviously, that is due to the very soft color palette and the large amounts of vanilla coloring. It was so relaxing to me then as a mom of a newborn and a nearly 3 year old. It still invokes feelings of relaxation in me today.
Claire's room is a very, very close second. She also had a very soft color palette with very light shades of rose and aqua.
Loved our back porch and yard. We ate outside very, very often!
Our house backed up to a farm. We had a lovely view of rows and rows of corn. We loved it there.
The Makings of a Boy's Room | Part 5

For the last post in my labor of love series on creating a fun, well designed boy's room, I am going to focus on the unique accessories. These are meant to be used as ideas; something to spark your creativity. If we all used the same accessories, they wouldn't be quite as unique.
On top of my boy's armoire are a few unique and very special items that go nicely with the rest of his room. The boots are authentic cowboy boots that were completely worn out by my very own husband as a child. (I also have a pair of my very own, but I wore the sole off of them and they need to be repaired!) These boots are important to me for obvious reasons.
The flag is one that was given to us by my husband's office and was flown at the capital of the United States. It was completely unexpected and completely appreciated.
The vintage book is titled, "Cowboy Sam" and is perfect for... obvious reasons.

This picture is a reprint of a genuine reward poster from the 1870s. They were hung all over central Texas in hopes of finding this infamous outlaw. It is especially cool because Bass actually happens to be my son's middle name.

These bamboo teethers are a set I found on Etsy made by little sapling toys. I hand picked the three I felt went with the whole Texas theme: a star, a coyote and of course, the beautiful state of Texas.

Lastly, I just want to highlight one of my favorite things to do in a kid's room. I love to mix functional decor with playful decor. Obviously, the playschool barn is a toy, but it goes so well in this room. The rocking horse is also a toy, but nestles in here nicely. This storage box is a random piece my mom found for me at a gift shop going out of business. I love the beautiful horses on it. It is perfect to pretty up the room. And it is perfect to store matchbox cars. That, my friends, is what I call great design.
Gratitude Tea Bag Holder
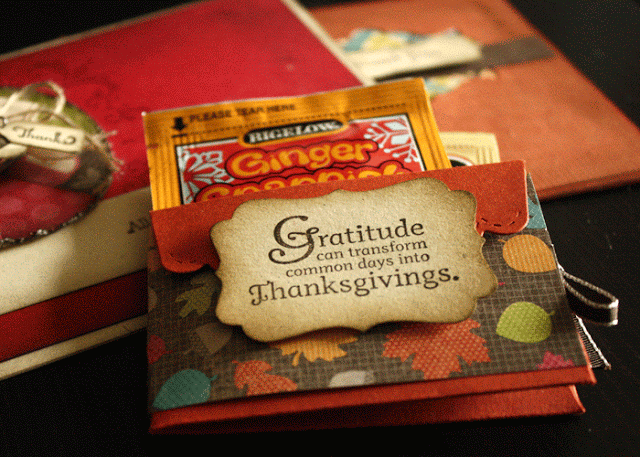
November is my absolute favorite month. Although fall officially begins in September, the weather seems to take a more dramatic turn towards autumn in late October, early November. My wedding anniversary is in November, as well as my favorite holiday. I love Thanksgiving because it seems to be one of the last holidays to be heavily influenced by commercialism. Now, I know Black Friday is commercialism at it's finest, but for that one day, it's all about gratitude and family.... and pumpkin pie.

Once assembled, I added a strip of Orchard Harvest designer series paper on top of a strip of taffeta ribbon. I stamped the sentiment on ivory naturals cardstock and punched it out with my decorative label punch. On the inside, I added a simple acorn stamp punched out with the small oval punch.
This simple project takes no time at all to put together and is a perfect little Thanksgiving gift for friends, family, teachers and of course your lovely hostess for Thanksgiving dinner!

Products Used (These can be purchased 24/7 at my Stampin' Up site by clicking on the item.)
Cardstock & Paper
Naturals Ivory Card Stock
Cajun Craze Card Stock
Orchard Harvest Designer Series Paper
Stamps & Ink
Day of Gratitude Stamp Set
Soft Suede Classic Ink
Embellisments
Linen Thread
Early Espresso 1/8" Taffeta Ribbon
Cardstock & Paper
Naturals Ivory Card Stock
Cajun Craze Card Stock
Orchard Harvest Designer Series Paper
Stamps & Ink
Day of Gratitude Stamp Set
Soft Suede Classic Ink
Embellisments
Linen Thread
Early Espresso 1/8" Taffeta Ribbon
The Thanksgiving Tree
I recently found the most beautiful gem. It is a free downloadable file from Ann at A Holy Experience. The file includes leaf templates with verses of thanksgiving already printed on them. On the back, you are to write something you are thankful for.

I'm thankful my six year old is thankful for us.
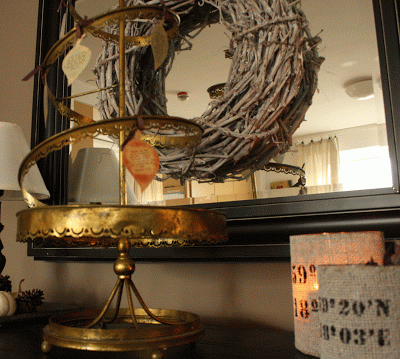
After writing your gratitude, you hang the leaves on a tree. You can attach them using binder clips, mini clothespins, twine or simple ribbon. Ann has used several branches in a lovely pot to create her tree. I remembered I have this lovely ornament tree that would be perfect for a project like this.
I printed out the leaves on cardstock to make them a little more sturdy and give them some dimension. I punched holes in the stems and strung ribbon through them all. I placed the leaves with some pens in the other candle holder on our buffet and they are ready to be utilized daily in November. Thank you, Ann, for this lovely project.
PS- The fabulous ornament tree was a gift from my lovely mother-in-law several years ago. I believe it was purchased on clearance at Michael's. A similar one can be found here.
Define Your Design | Industrial
In the weeks leading up to Christmas, I'll be feauturing a series of posts that will hopefully help you identify your home decor style. Of course, there is always the eclectic style that takes bits and pieces from everywhere simply because they love them. And love is the secret to a greatly styled home. It doesn't matter where the pieces come from or what category they fall under. All that matters is your decor makes you and your family feel good.

For the first category, I'm stepping outside my comfort zone a little bit. While I think the industrial style is something that can look incredibly chic, it's not one I've overly experimented with. There are a few pieces in my home that would easily fall into this category and I'd love to add more. It was fun searching out pieces to highlight today.
Industrial home decor is pretty much exactly what it sounds. Picture metal accessories, chunky furniture on castors and minimalism at it's finest. There is something so elegant about industrial design. If you find your heart leaning towards this style, here are some pieces I think would be a fabulous addition to your home for Christmas.
Faux Wood Organizer by Orange Door Cottage | This piece would make a great organizer for all of the lovely cards and photos you receive from friends and family. I also would love to see it as a place to keep Christmas books so they are easily accessible to your children throughout the holiday season.
star 9 candleholder from CB2 | A fairly simple accent piece to add a soft glow in the evenings.
Twig Wreath from Save On Crafts | A wreath is a must during the holidays. This wreath is simple and clean so it adds a festive look without being too frilly.
Believe Wall Art by Functional Sculpture | A beautiful statement piece... in more ways than one.
Believe Wall Art by Functional Sculpture | A beautiful statement piece... in more ways than one.
Twig Reindeer from Pottery Barn | A fun, yet chic addition for the holidays.
Vintage Metal Star Ornament by Merrit Hyde | These ornaments are so lovely and we perfect for the tree or as accents anywhere in your home.
Punched Silver Tree Topper (not pictured) from Crate and Barrel | And of course, you have to have a tree topper. This one with it's crisp lines and stately metal look would be the perfect addition.
The Makings of a Boy's Room | Part 4
Add Complimentary Storage Options
One thing is for certain: When you have a baby, you will need storage. In the infant months, it's for diapers, wipes and burp cloths. With toddlerhood comes the invasion of toys and the collection just keeps growing from there. It's best to think about storage options from the beginning. I like to try to find versatile pieces that will grow with our needs.
The Expedit Shelving Unit from IKEA is one of my favorites for this reason. We actually purchased it to store toys in our girls' room. When we moved, it became a storage/display piece in the baby's room.

And as he's grown, our needs have changed. We turned it horizontally once again and it's the perfect height for him to play with his toys on... or to climb on and look out his window.

Another one of my favorite storage options is this laundry basket. I know it sounds crazy, but the color of it works nicely with his room and it's just perfect for throwing in those random toys at the end of the day.

And of course, there is the armoire I discussed in my Part 3. No matter what storage options you choose, remember to think outside the box and to think towards the future!
Tuscan Cachepot {Local Find}
I've been meaning to post about these little beauties for quite a while. Having just returned from Tuscany myself, I guess I finally found my inspiration.

In the last year or so, I have seen these cachepots, urns and vases featured all over including two of my favorites: Pottery Barn and Ballard Designs. Of course Ballard and Pottery Barn are each asking up to $99!

Not only are my containers a sweet, inexpensive alternative to the ones found at Pottery Barn and Ballard Designs; they can also be found locally in the greater Stuttgart area. The smaller cachepot (my favorite!) was found at Idee on Königstraße for only €6.99.

Even better than that, my larger flower pot can be found at Hofmeister for €1.99!! You simply cannot beat that deal.
Even better than that, my larger flower pot can be found at Hofmeister for €1.99!! You simply cannot beat that deal.
The Makings of a Boy's Room | Part 3
Design with your child and yourself in mind.

When shopping for furniture pieces and accessories for your child's room, choose items you would put anywhere in your home. Try to avoid pieces that are totally marketed towards children. Doing this serves two purposes: Style and longevity.

Changing tables are a perfect example of furniture marketed completely towards children. Yes, they are awesome and there is definitely a place for them. But what happens to that piece of furniture when your child is potty trained? For me, the best option was finding a simple dresser and adding a changing pad on top. We found ours at IKEA. It's very, very basic. It works in Sam's room now. Later, I can paint it, change the hardware and use it as an entryway piece to store shoes. Or I can keep it white and throw it in my craft room to store all of my supplies. I can slap on chalkboard paint and use it in the school room. The list of possibilities is endless. This piece of furniture has a long and happy life in front of it.
As for style...There is just something about walking into a child's room and seeing the unexpected. The armoire in the photo above is a perfect example. It's a statement piece. That doesn't mean it was expensive. It means the piece has a voice. It tells a story. This armoire was a very inexpensive floor model at an already inexpensive discount store. It has served as a tv hutch in our newly finished basement, an entertainment center in a family room, a clothing wardrobe in our master bedroom and now center stage in our son's room. When we chose this piece of furniture we had no idea the roles it would play in our home. That is why choosing a piece you love is so important. Don't settle! Think outside the baby superstore box! Every piece of furniture speaks. What do you want yours to say?